

How To Draw Faces At Different Angles
The Pace-past-Step Guide on How to Draw a Portrait
By Vladimir London
In this book, you will discover the step by footstep process of how to describe a head in the three-quarters view.
It is written and illustrated by Vladimir London, internationally published writer and the founder of Drawing Academy.
Preface
In the Drawing Academy course, students often enquire me how to depict a portrait so it looks realistic. I also regularly receive portrait drawings for critique that have mutual mistakes like misplaced facial features, incorrect proportions, wrong perspective, and and then on. Such mistakes happen considering of:
- Not knowing or not following constructive drawing principles
- Ignoring man head proportions
- Knowledge gaps in a human anatomy.
The biggest claiming in drawing portraits arrives from the misconception of how art is created – students draw not what they know, but re-create what they run into. This leads to inevitable mistakes.
To explain why the principle "Draw What You lot Know, non What You lot See" is important, I'll requite you an instance. When drawing from life, art students are doing their all-time to describe optics, nose and mouth every bit they meet it on a model, forgetting, still, the overall construction of the caput. Information technology is like decorating walls before building a house.
To "build" a head in portrait drawing requires much more than than simply copying what you see. And the necessary know-how only comes with crucial noesis. You simply won't run into the definiteness of proportions if yous don't know what those proportions are.
So, in this series of articles, I will share with y'all the in-depth step-past-footstep know-how of portrait drawing every bit information technology's taught in one of the Globe'due south all-time art institutions – Repin Academy in St. petersburg, Russian federation. This process is also described in my volume "How to Draw a Portrait in the Three Quarters View" available on Amazon.
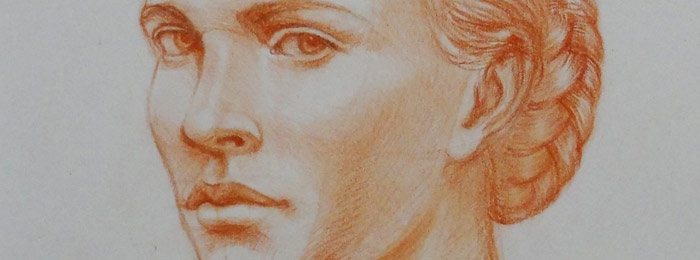
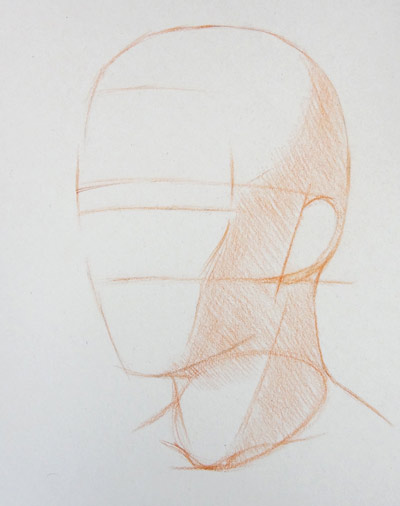
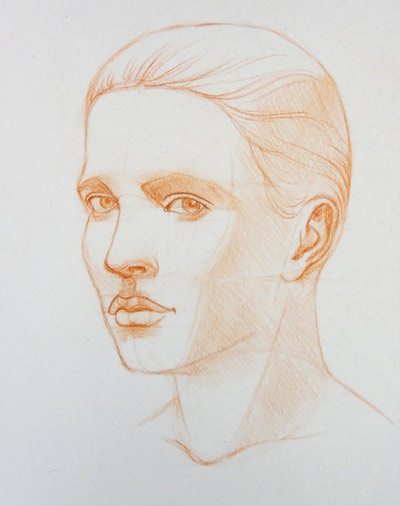
Here'southward how the finishes sketch looks. Y'all will be able to describe similar portraits by the end of this exercise should you follow closely my instructions.
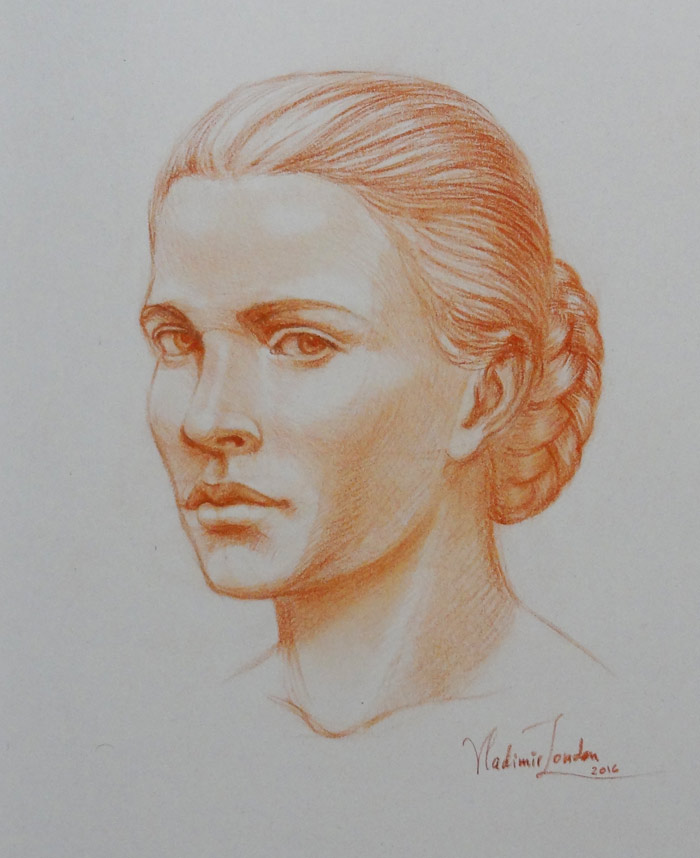
This quick cartoon was washed in blood-red pastel pencil; however, feel complimentary to utilise any cartoon medium of your selection. It is not nigh color, but effective cartoon principles, rules of perspective, head proportions and beefcake, which won't change whether you draw in graphite pencil, charcoal or with your finger on sand.
How to Depict a Portrait in the Three Quarters View
Before drawing begins
I would suggest getting a model or drawing a self-portrait looking in a mirror.
Outset, clarify the caput, chose the view angle, and decide on the artwork size and layout. Fix paper to a drawing board and get your pencil sharpened.
1. First step
Begin with measuring the main proportion of the model's head – its width-to-height ratio using a pencil or past middle. Many art students ask me how to measure with a pencil; to respond, I created this article – //drawingacademy.com/how-to-measure-with-a-pencil
 This proportion varies depending on the view angle. Make sure to get information technology every bit accurate as you can.
When you have this ratio measured, decide on a limerick of your time to come portrait – how large the head would be and where on paper it will exist located.
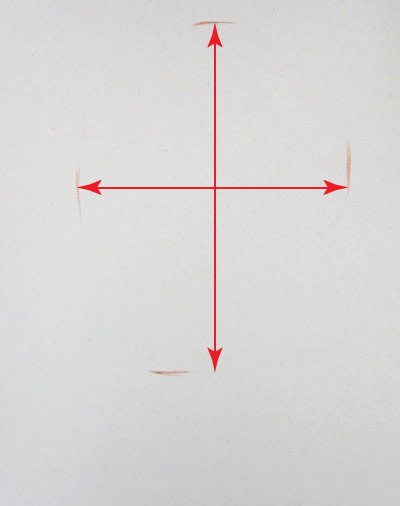
Mark four strokes – the tiptop, lesser as well every bit the left and right edges of the caput. Make sure in that location is enough infinite in front end of the head – "nose room" and the head is non too close to the top edge of paper. It is besides good to take more than space beneath the head than higher up.
Train your eyes past marking those edges freehand and, if necessary, double-cheque the main proportion using a pencil.
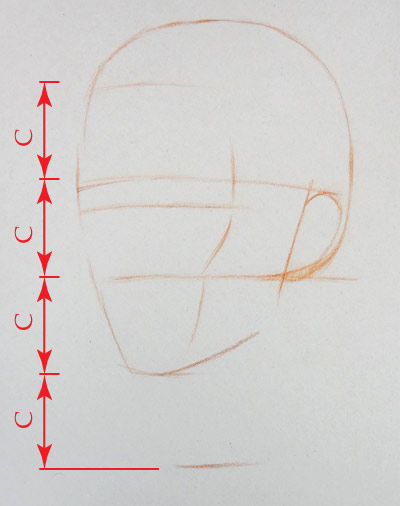
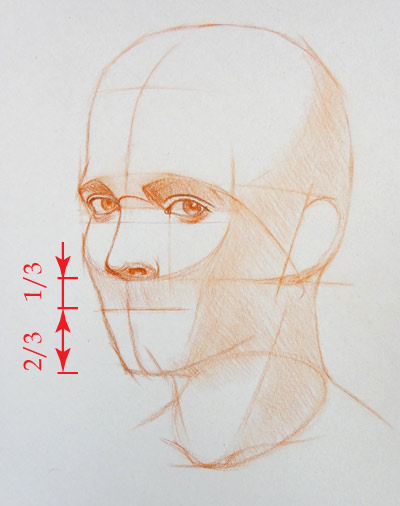
2. Dividing the face into three parts
The next step requires a know-how of the universal proportion of the confront. All adult faces regardless of private appearances share the same proportion – the distance between the hair-root line and the lesser border of the chin tin can be divided in three equal parts:
- From the hair-root line to the eyebrow line
- From the eyebrow line to the base of the nose
- From the base of the nose to the bottom of the chin.
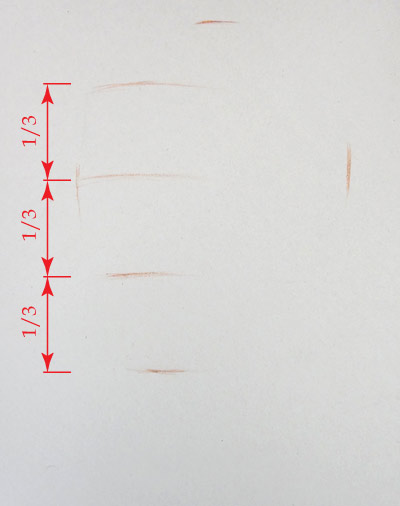 Observe on the model where the pilus-root line is intended by nature and mark this line on the drawing. Carve up the distance from that line to the lesser of the head into three equal parts past eye or using a pencil as a measuring stick. Do information technology equally accurate as you lot can; precise location of these iii parts will aid yous in placing facial features correctly.
If the model'due south head is on the same level every bit yours, you would see those three lines horizontal. When the model is located college than a viewer, lines will be curved upward. The contrary is also truthful – lines will be curved down when a model'due south caput is located lower. The curvature depends on the view angle.
To go on things uncomplicated for this exercise, we draw a portrait at our eye-level.
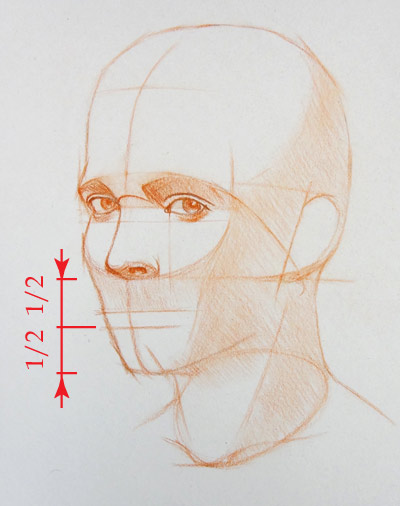
3. Placing the eye-line
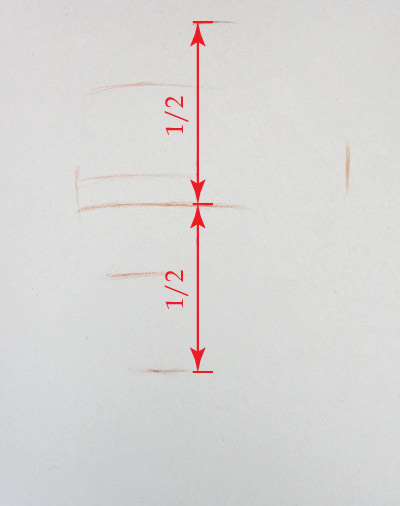
The following footstep comes from the know-how – this proportion is not measured on a model'due south caput, it is universal for all portraits – the center-line divides the meridian of the head in half.
So, we can place the eye-line with confidence, marking it either freehand or using a pencil to measure where the middle of the head is.
This horizontal line, of form, will be located below the countenance line that we marked in the previous step.
 I have to make a disclaimer that the centre-line can be tilted or curved depending on a view bending. In such case, yous need to go along in mind that distances of this proportion could exist foreshortened in perspective and the top border of the head in your drawing might not stand for to the actual pinnacle point of the model'south head. So, if nosotros see a head from in a higher place, the eye-line would exist curved downward and announced lower than the actual middle indicate between the top and bottom marks of the head.
If the paragraph in a higher place sounds a bit confusing, think of a cylinder seen from in a higher place in perspective and imagine how its heart line curves downward and where it is located in relation to the cylinder's top and bottom edges. To guide you through the challenging topic of how to draw in perspective, I created this free video lesson – //drawingacademy.com/drawing-in-perspective
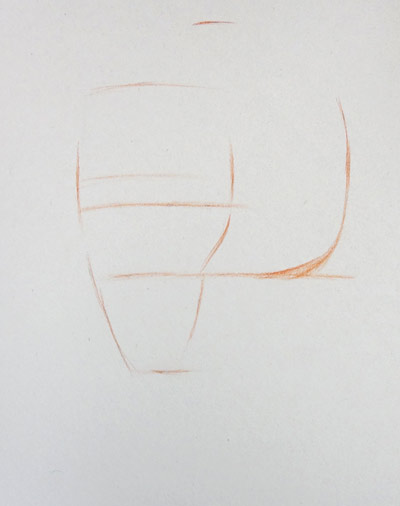
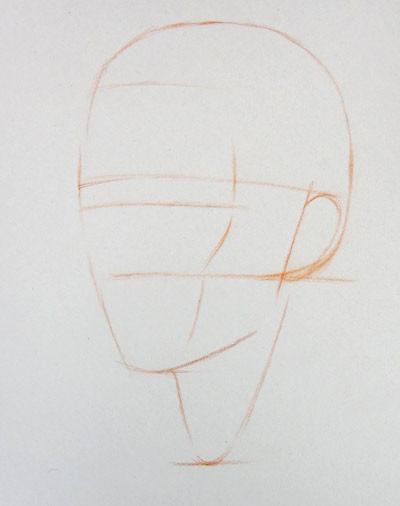
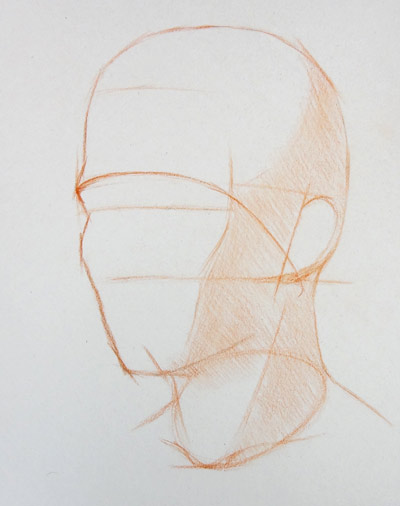
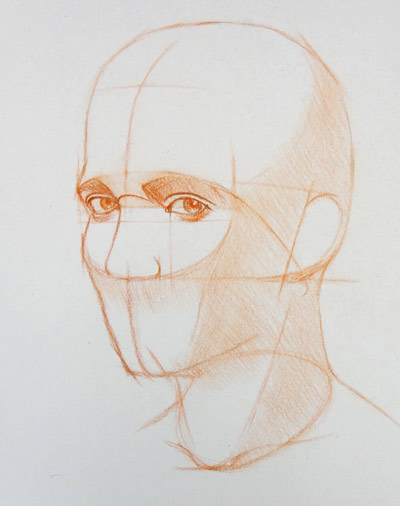
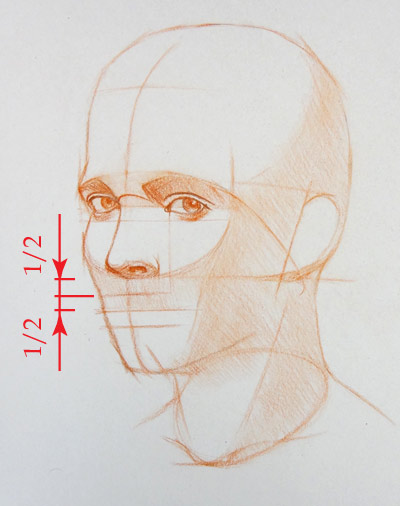
4. Base of operations of the skull and edge of the cheekbone
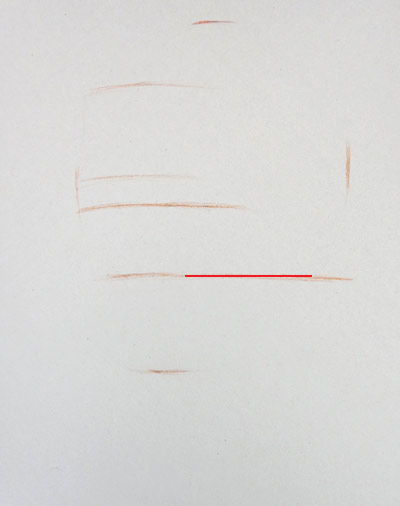 Location the plane of the skull base will aid us to connect the head, neck and shoulders correctly. This aeroplane is on the aforementioned level as the base of operations of the nose, which too corresponds to the lesser border of the cheekbone. This level is marked in red line.
five. Lower part of the attic
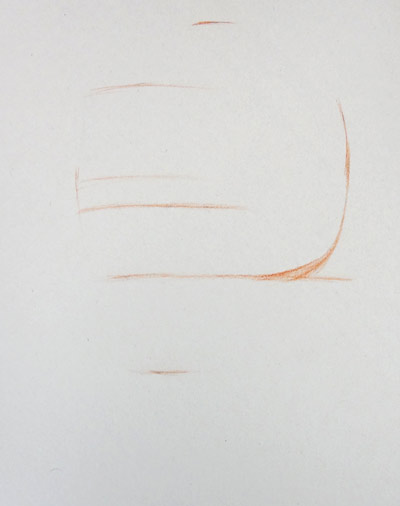 In this footstep we marker the location of the lower role of the cranium. Although it might be hidden by long hairs or a tall collar we practise it using 1 of the constructive drawing principles – cartoon objects as if they are transparent.
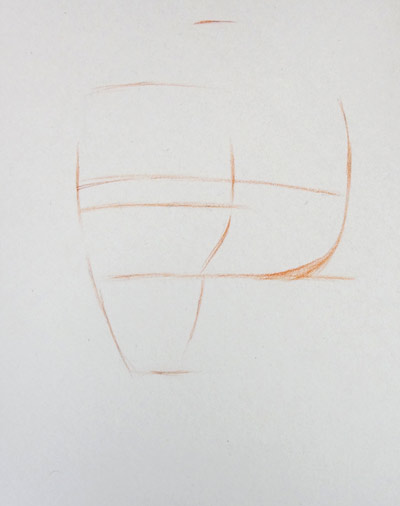
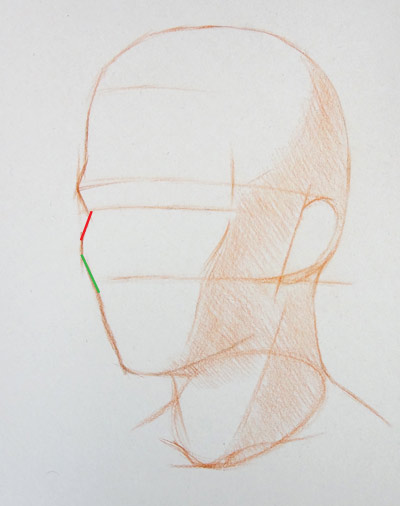
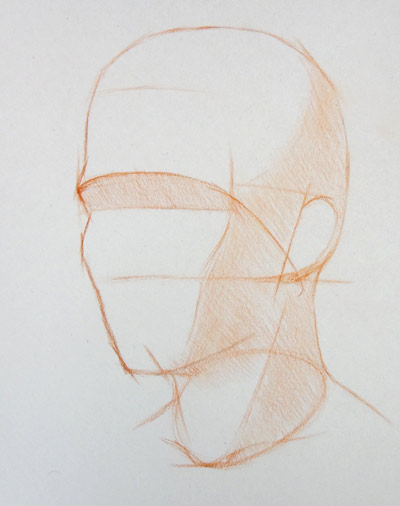
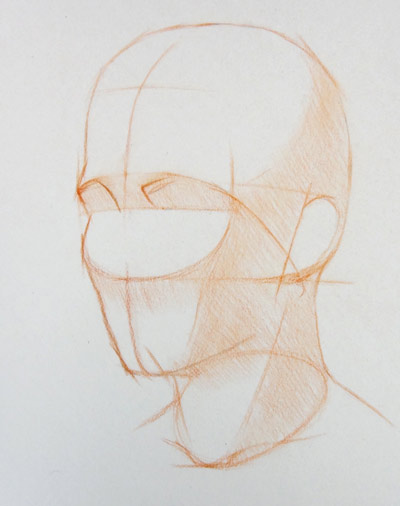
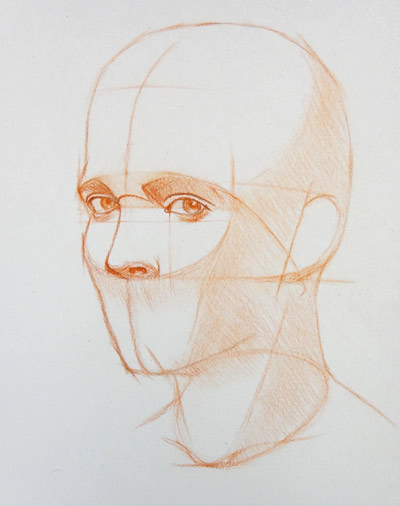
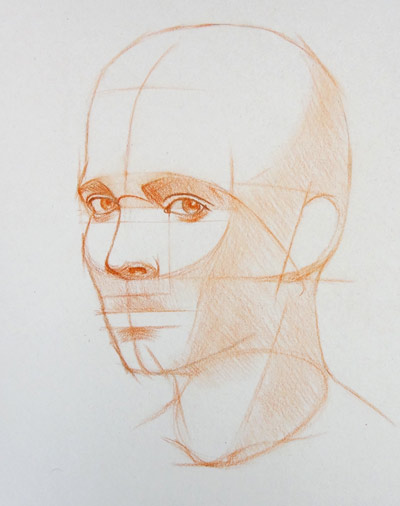
6. Locating the eyebrow
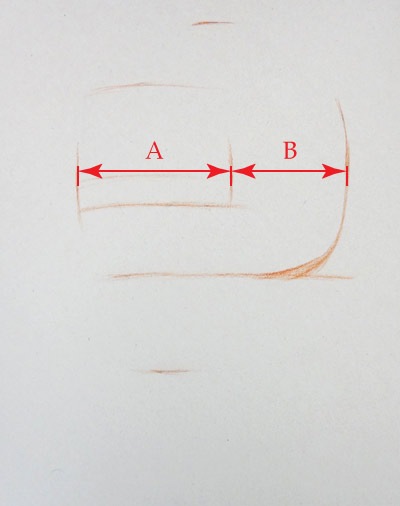 The eyebrow's edge is an of import marker of the head. This virtual line marks the head's planes, separating the face from the side of the head. This border too serves every bit a border between tonal values of light and shade.
The eyebrow's border location depends on the angle of view. It has to be measured on the model by comparing distances "A" and "B".
After on, this edge will too help us to determine the position of the ear.
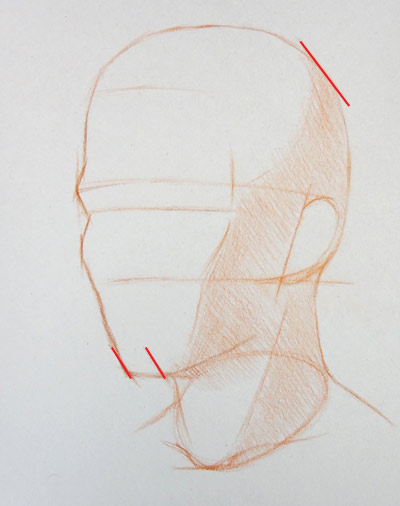
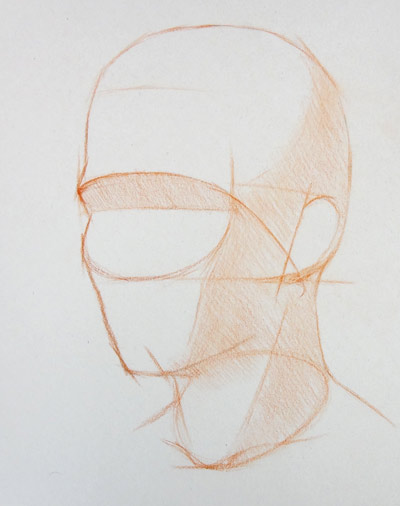
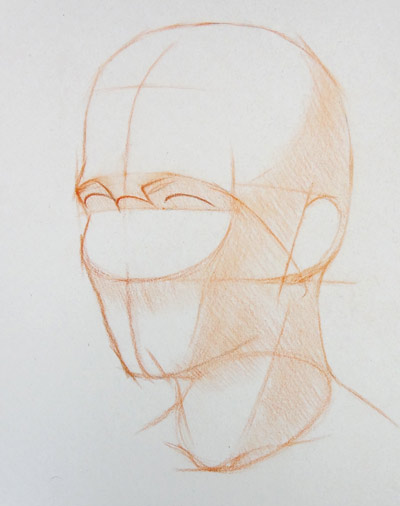
7. Defining contours of the confront
 Contours of the confront are very important virtual lines that help to define portrait's likeness.
A contour should not be confused with an outline. In the drawing beneath, contours of cheekbones and jawlines are marked as contours. These lines are individual; angles of which have to exist measured on the model. Contours here draw the shape of the model's face.
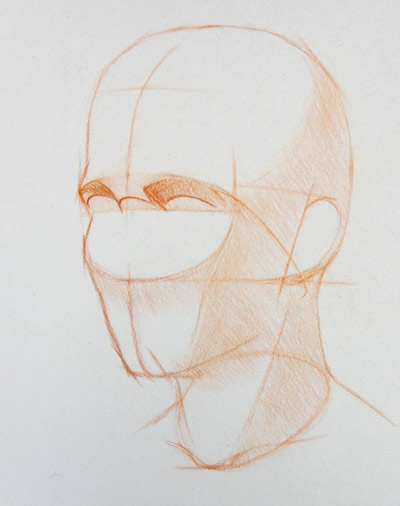
eight. Indicating the meridian edge of the ear
 Unlike in previous stride, where contours of the confront are individual, location of the elevation border of the ear is universal for all portraits. This edge is on the same level equally the eyebrows line. To mark the top of the ear, we extend the eyebrows line horizontally towards backside of the head.
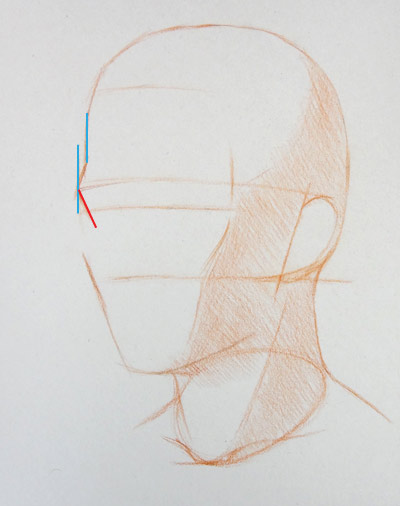
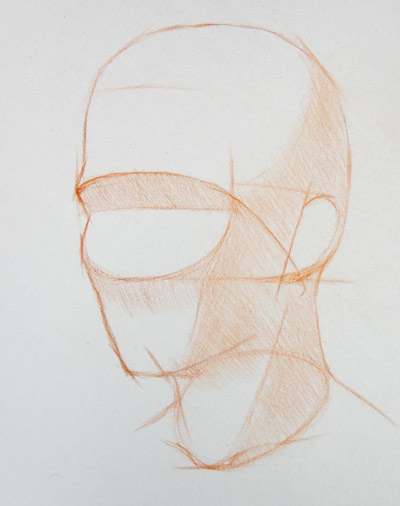
9. How to identify the ear correctly
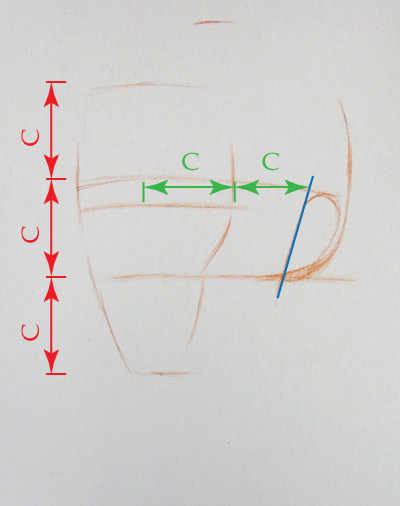 As the Drawing University tutor, I often receive for critique portrait drawings that have one common error – a miss-located ear. To avert such a junior error you need to know the post-obit rules:
- The summit of an ear is on the same level as the line of eyebrows.
- The bottom edge of an ear is on the same level as the base of the nose.
- The distances from the edge of the eyebrows to the ear and to the middle of the confront are equal (marked by "C" in green). In perspective, these distances will be foreshortened. This is the same distance as between the hair-roots and the eyebrows line, the eyebrows and the base of the nose, and the base of the nose and the mentum (marked past "C" in red).
- The line where an ear connects to the head is non vertical just tilted backward (blueish line).
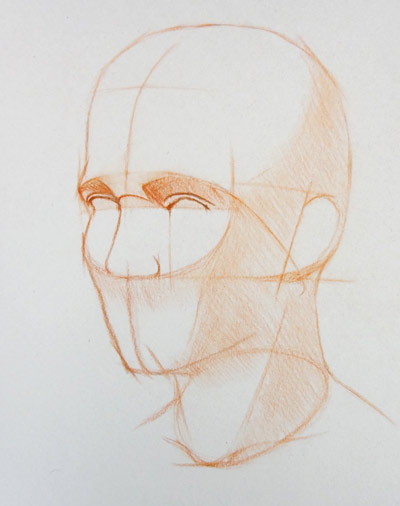
ten. Placing the pit of the neck
 Another common fault art students make is forgetting well-nigh the neck and drawing it as an afterthought when the caput is fully fatigued. It is almost impossible to describe believable looking portraits from life or imagination without the knowledge of a head and shoulders anatomy.
Let's point an important landmark of the portrait – the pit of the neck. It is located between two collarbones just in a higher place the breastbone.
The distance from the chin to the pit of the cervix is equal to the i-third proportion of the face (marked past "C" in red).
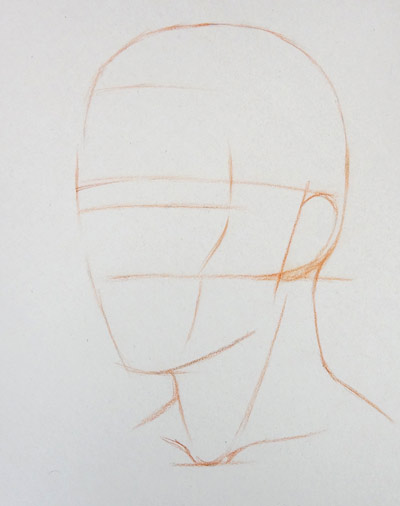
11. Why sternocleidomastoid musculus is important in portrait drawing
 The muscle with a very long name, sternocleidomastoid, is an important landmark when it comes to drawing a neck. It connects the meridian office of sternum (breastbone) and clavicle (collarbone) with the base of the skull chosen mastoid – the process of the skull positioned only behind the ear.
We draw this muscle diagonally. In drawing, this muscle non only defines the shape of the neck but also separates its frontal part from the side plane.
12. Trapezium
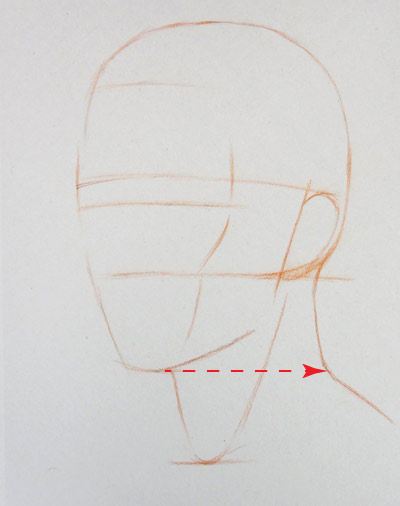 The trapezium is some other important muscle that defines the shape of the backside of the neck.
In that location is one signal y'all need to define when cartoon a cervix in the 3 quarters view – the place where the cervix changes into the bending of trapezium. This point is on the same level as the bottom edge of the chin; see the dotted line on the cartoon beneath.
thirteen. Outlines of the cervix and collarbones
 Following the constructive cartoon principles, we draw not what we see, simply what we know. This fully applies to collarbones, which can be covered by model'south apparel.
In perspective, the axes of collarbones appear foreshortened and tilted. The pair of collarbones is curved like a cupid's bow or a stretched double "S". It connects the breastbone with the shoulder blades.
Outlines of the neck are private and you lot have to observe its shape on the model.
It is a proficient approach to draw shoulders as one continuous line from one shoulder to another, making sure they are on the same level and look natural.
14. Drawing the base of the neck
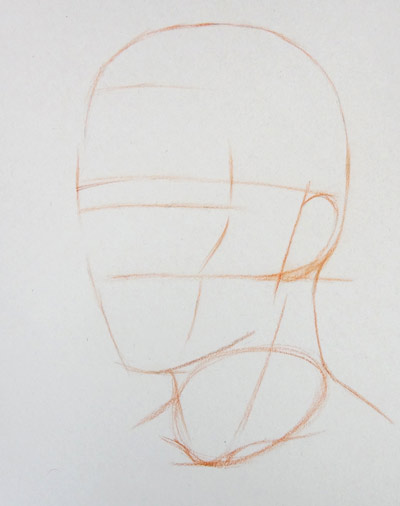 When main outlines and contours of the neck in place, nosotros can mark the base of the cervix. It has a circular shape and in perspective appears equally a tilted oval. This oval goes through the top pair of ribs and defines the width of the cervix at its base. This oval also marks the size of the top of the ribcage.
The base of the neck is an important contour because it separates vertical planes of the cervix from more horizontal surfaces of the shoulders. As such, it serves as a border betwixt light and shaded areas of those surfaces.
fifteen. Rendering the master shades of the portrait
 Then far, we do non draw any facial features or pocket-sized details. Instead, we build a solid construction of the caput in drawing. This will assistance united states to avoid mistakes and misplacements when it comes to drawing facial features. Cartoon eyes, mouth, olfactory organ, etc. at this stage is like decorating the walls before edifice a business firm.
Although this is a very general outline of the head, it is a fourth dimension to block-in the main shades of the portrait.
Apply very light pencil pressure to render shaded areas of the caput and neck.
16. Cartoon outlines of the eyebrow
 Check model's forehead and eyebrow outline – it will be individual to every person.
Notice how this outline is protruding in front of the forehead – this altitude is indicated in blue lines on the drawing below.
The eyebrow outline has its characteristic bending (marked in scarlet lines).
17. Outlines of the cheekbone
 We move downward along the contour of the face, this time paying attention to the individual contour of the cheekbone.
Once over again, bank check this outline on the model; pay attention how far information technology bends and compare to the outline of the eyebrow. Usually, the eyebrow would be extended forward a scrap more than the outline of the cheekbone.
The centre socket outline depicted in the previous step continues downwardly with the cheekbone outline.
You can also need to bank check the direction of the line that goes towards the jawbone (indicated in greenish on the drawing below).
18. Parallel contours of the chin
 Normally, female person chin is less pronounced than a male 1; nevertheless, both male person and female jaws have characteristic management of outlines that can be marked in two parallel lines, which are as well parallel to the line of the back of the head (marked in red).
19. Drawing the eyebrow curve
 In a human being head, the edge between the cranial part of the skull, which protects the brain, and the facial part of the skull can be indicated by a curved virtual line that goes through the eyebrows and then sloped towards the ear channel.
This virtual curved line helps to build properly the span of eyebrows, which is not directly, but bent downwardly.
20. Indicating the plane under the eyebrows
 With the curved line of eyebrows defined, we can caw block shaded area below it. In most cases, the source of lite is in a higher place a model'due south head, therefore it will exist a shade under eyebrows. So, we marking this shade in light tone applying very low-cal pencil pressure level.
Every bit yous come across, we are even so defining large masses without any attention to facial features like eyes, nose and mouth. Drawing such facial features before the main shape of the head is build proficiently is like decorating walls of a house that yet to exist synthetic. This sequence will help you to ensure correct proportions of the portrait and volition result in greater likeness when we practise the rest of the portrait.
21. Defining the cheekbones curve
 The cheekbones curve defines another important contour of the face. It bends downward from one cheekbone to another, with its lowest indicate at the base of the olfactory organ.
This virtual line is the border between the frontal part of the cheekbones and the upper jaw section.
A portrait creative person can simply keep this line in heed rather than actually describe it. Withal, as a office of the head construction, this line helps to "build" the portrait geometrically correct and proportionate.
22. Blocking the shade beneath the cheekbones' curve
 Equally mentioned before, the cheekbones bend separates two surfaces of the face. The surface of cheekbones above that line is facing the source of calorie-free and therefore will announced lighter than the surface below.
To point this difference in tonal values, nosotros shade in very calorie-free pencil strokes the darker area right below the cheekbones bend.
At that place is no need to worry about exact tonal value of this plane right now. All nosotros want from this stride is to show that 2 planes on both sides of the cheekbones bend have dissimilar tonal values. We volition fine-tune the exact tonal values later on in this lesson.
23. Drawing the central line of the face
 A virtual line that goes exactly in the middle of a face from the very top of the forehead to the bottom of the chin is 1 of the nigh important landmarks of every human face. Information technology serves as the axis of symmetry and is used to balance all facial features at the aforementioned distances from that line.
Because the olfactory organ is located in front of this line, nosotros tin can break the line or mark it very thinly within the olfactory organ area, and then it would not interfere with lines of the nose later.
Many drawing books and tutorials advise drawing a primal line of the face much earlier in a portrait drawing. The reason why we exercise it at present is because it is much easier, especially for beginners, to marker this line with precision when the overall structure of the caput is in place.
I want to betoken once again that the sequence of steps is a personal preference and some artists exercise not draw all virtual lines at all, keeping them in mind instead.
24. Marking contours of the eyebrows' corners
 With the primal facial line in place, we tin can go on past drawing smaller details making sure that facial features are symmetrical in relation to that line.
The shape of eyebrows is individual and you demand to observe its grapheme on the model first.
The span of the nose is adjoining with the eyebrows corners, so we demand to portray its width and angle.
25. Mark the upper eyelids' contours
 With the inner corners of eyebrows in place nosotros can now mark the curvature of the span of the nose. This line is a helpful landmark, which commonly coincides with the level of the upper eyelids contours. Because every face is private, you need to check this level on the model and adapt the drawing if required.
Symmetrical features like eyelids have to describe in pairs, making sure they are located on the aforementioned virtual horizontal line and have similar curvature. This helps to avoid the mistake of drawing one eye higher or lower than the other.
26. Shading the area above the upper eyelids
 The area below eyebrows has darker tones than upper eyelids. So, nosotros could build upward tonal values to block the surface area above the eyes.
Go low-cal with rendering upper eyelids. We volition come back to darken these tonal values to required depth later on. It is a expert technique to build tones gradually. A proficient way of applying pencil strokes is along object'due south contours. Also, if you are drawing in graphite pencil, smudging pencil marks is a big no-no. I will explicate why later.
27. Marking the corners of the eyes
Depicting eyes with precision is a disquisitional pace in portrait drawing. Information technology is not an easy task for beginners. I often receive portrait drawings for critique with eyes that are too close to each other or non symmetrical.
To pinpoint the verbal location of eyes in a portrait drawing, you can use the following rules:
- The altitude between well-positioned eyes is equal to the length of one eye.
- Both eyes must exist on the same level, which is the horizontal line that divides the elevation of the caput in half.
 These rules are easy to use when you draw a full-face up straight view portrait. In our case, information technology is a scrap more complicated because the caput is turned three-quarters and, therefore, is foreshortened in perspective. The eye-line is too slightly curved in this view.
Nosotros begin with marking model left eye'south corners. Check the distance from the central line of the face to the eye'south inner corner. Brand sure, this corner is not as well shut to the nose in your drawing.
When this inner corner of the eye is pinpointed with necessary precision, you tin can too mark the wing of the nose, which is slightly closer to the central line of the face. I marked the distance between the center's corner and the nose border in red lines.
Check the length of the heart on the model and mark it in drawing.
Repeat this pace for model's correct eye. In the three-quarter view, the nose can overlap the inner corner of another centre. Draw this center consummate equally if the olfactory organ is transparent.
28. Depicting eyelids
 With all four corners of eyes in place, we can "build" eyelids with precision. I'one thousand using the word "build" rather than "draw" because we use constructive drawing principles, drawing what we know instead of copying what we see. This is especially critical when portraying eyes.
An eye is a ball about one inch in diameter and eyelids wrap effectually this ball. Despite an eyelid is a very sparse musculus, it has certain thickness that has to be depicted.
There is one rule you must know to draw eyelids skillfully – upper and lower eyelids are not symmetrical. The upper eyelid has its tiptop point one-third distance from the inner corner while the lower eyelid has the lowest betoken of its curve 1-3rd from the outer corner of the eye. Avoid a junior error of drawing tuna-shaped symmetrical eyelids.
This rule is easier to follow in straight view portraits. In our example, the upper eyelid is foreshortened in perspective. Nevertheless, the rule is nevertheless in place.
29. How to Depict Eyes
 With eyelids depicted accurately, nosotros tin can place an iris of the eye. Here's some other amateur mistake you must avoid – placing an iris as a full circle symmetrically between the upper and lower eyelids. Usually, the upper office of an iris is partially covered by the upper eyelid while information technology might be a small-scale gap between the lower border of the iris the lower eyelid.
Y'all should also remember that the eyeball is not pure white and ofttimes has darker tonal values than highlights of the forehead, for case. Likewise, there is a casted shadow nether the upper eyelid.
Many art students ask me "how to draw eyelashes?" The professional way is not to describe private eyelashes unless it is an advert drawing for mascara. One night curved line would do the job. This is specially important for male portraits.
To learn more about how to draw eyes in this video lesson »
30. How to depict a nose
 The shape of the nose can be simplified as a prism. The base of the nose is already marked at the same level as the bottom edge of the ear and the bridge of the nose is curving between eyes. The width of the nose tin can exist double-checked by comparison it to the distance between eyes.
The individual shape of the nose has to be observed on the model. Shapes can vary from person to person and capturing likeness depends on how accurately yous "build" model'southward nose contours and outlines.
Starting time, you can simplify nose contours as straight lines, depicting their angles and proportions. And so, you can smooth-up lines with softer corners.
The lower plane of the nose is in shadow and its tonal value can be blocked in light tones for at present. Nosotros volition work on tonal values with necessary depth later.
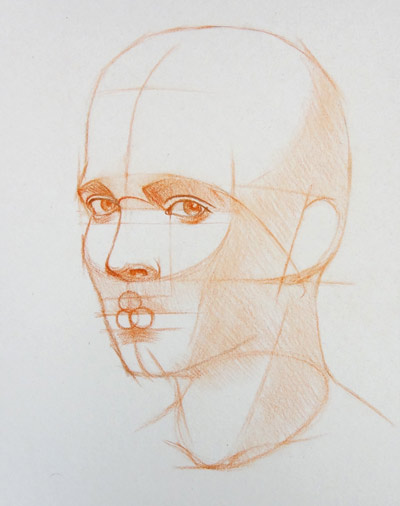
31. How to place a oral cavity correctly
 When cartoon a mouth, there are some proportions you can you to place it correctly.
We begin with placing the line between lips. This line is located 1-third from the base of operations of the olfactory organ to the lesser of the chin. This is an ideal proportion in existent life it cad differ, so you can measure out this altitude and adjust if required.
If yous describe an open up mouth, keep in mind that the lower edge of the upper lip usually would be at the halfway indicate of the upper forepart teeth.
Of course, when drawing a portrait in the 3-quarters view, the line between lips will appear in perspective and might not be straight in your drawing.
32. Placing the lower lip
 It is quite like shooting fish in a barrel to locate the bottom lip – its lower edge is exactly in the heart of the distance from the base of operations of the nose to the bottom border of the chin. This proportion is also idealized and should be amended if your model is slightly different.
Avoid a junior mistake of placing the mouth exactly in the heart between the nose and the chin. It is really located in the upper one-half of this altitude.
33. Marking the upper lip
 To locate the upper lip, simply divide the upper one-half of the distance from the olfactory organ to the mentum in half. Once again, this line is marked according to classical proportions.
34. Blocking shades of the mouth
 So far, we accept 3 parallel lines corresponding to the upper and lower edges of the mouth and the line between lips.
To indicate the form, we can slightly render shaded areas of the mouth, which are the upper lip and the identify beneath the lower lip.
At this footstep, we only differentiate planes of the rima oris without going into details.
35. How to draw a rima oris in a three-quarter view
 When it comes to depict a oral fissure in perspective, there are few things you demand to keep in listen. First of all, it is important to draw what yous know – the construction of the mouth, rather than re-create what you see – outlines of lips. Copying leads to inevitable inferior mistakes.
Hither'southward what you need to know. The mouth's construction has a iii-dimensional nature. The upper and lower lips not only curved equally a cupid's bow, resembling widespread characters "Grand" and "W", merely also curved from front end to back from the mouth heart to edges. This presents a certain challenge in three-quarter drawing.
The one-half of the mouth that is further from the viewer will exist considerably foreshortened in perspective, while some other half will be visible in without foreshortening.
In that location is one simple way y'all tin apply to overcome a challenge of drawing a oral cavity. Draw three equal size assurance – 2 at the bottom and i above them, all touching each other. These assurance should exist constructed in perspective, and then one that is closer to the viewer might partially cover other assurance. The upper brawl sits in the eye of the upper lip and two lower balls correspond to the bottom lip.
To acquire more, cheque this video lesson on how to draw a oral fissure »
36. Cartoon the mouth's outlines
 In previous step, we put iii circles equally the base of the lips – two balls for the lower lip and ane above them. Now, these balls tin can help us to define the outlines of the mouth.
The meridian ball coincides with the central part of the upper lip. The upper lip's groove divides this ball approximately in half.
The bottom outline of the lower lip goes around two assurance, and the line between lips curves around all three balls, resembling a cupid's bow.
37. Defining the contours of the rima oris's
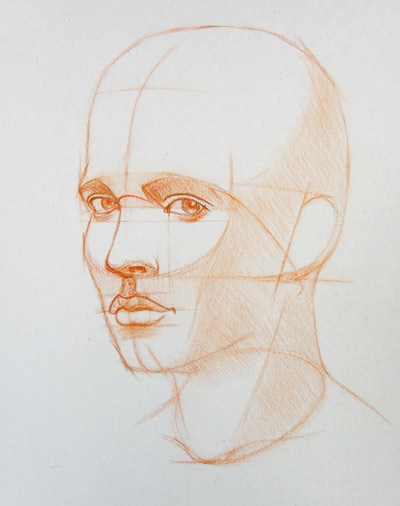 With master outlines of the moth in identify, we can further define contours of the mouth. At his step, virtual assurance of the rima oris are redundant and tin exist erased altogether. This is the time to observe model'southward mouth shapes and depict its private shape, trying to attain the necessary likeness.
Brand sure that the linear perspective is in identify and the half of the mouth that is farther away from a viewer has more foreshortening than another one-half.
38. Virtual angles of the mouth
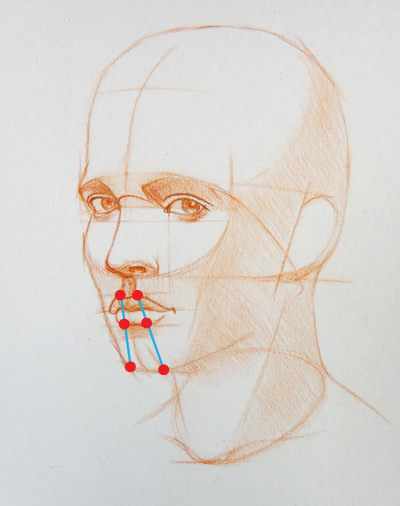 When defining the profile and outlines of the mouth, you can double-bank check angles that normally follow this rule – the upper lip acme points, connected with the lower lip bottom points class two lines that get diagonally to the prominent points of the chin. Every model has its individual shape of the mouth and mentum, but in general, the upper lip protrudes more forrard than the lower lip and the lower lip protrudes more than than the mentum. This protrusion is usually forms a trapezium aeroplane that is based on half dozen points of the mentum and lips (marked with red dots).
You lot tin can either draw those lines and dots or go on them in listen.
39. How to depict an ear
 The ear'southward outline was marked a few steps earlier; information technology resembles the grapheme "C." It's a good fourth dimension to double-check its main proportion, which is the height of the ear is equal to the height of the nose or the distance between the line of eyebrows and the base of the nose.
The ear'southward elevation divided in one-half volition give us a dimension of the ear'southward width.
Further, we can divide the meridian of the ear in three equal parts. Every role is as follows:
- At the top, there is the antihelix, which is the outer rim of the ear.
- The heart 3rd coincides with the concha – the ear's bowl.
- And the lower part is taken past the lobule.
The curve of the antihelix is echoed past another rim that is located inside and chosen the helix. At the superlative of the ear'south bowl, the helix splits into two artillery similar the character "Y".
Yous will find more information on how to draw an ear in this video lesson »
forty. Defining the side plane of the head
 The curve where the forehead'due south plane changes into the side plane of the head is an important "landmark". Usually, at this edge tonal values volition change from lite to darker tones. This border tin can be marked earlier in drawing and at present we can double-check its location and employ light tonal shades to differentiate planes of the head.
41. Shading the temple
 To carve up the plane of the temporal bone, we can shade its tonal value using wide strokes with light pencil pressure.
The direction of the strokes tin go contours of that plane to emphasize its spatial position. There'due south no need to finish this function in one go, we will come up back to information technology later on to deepen the tonal values as required.
42. How to draw a hairstyle
 Up to this step, I've intentionally left the hairstyle untouched to demonstrate the planes and construction of the model's caput. Drawing a bold caput is not required and you can indicate the hair volume much earlier in the drawing.
Students often ask me how to describe hairs. At that place are several points to keep in mind:
- Draw a hairstyle not every bit individual hairs, just as one big mass.
- Construct planes of the hairstyle.
- Avert rendering individual curls in the beginning. Details will come later.
- Apply pencil strokes along hairstyle contours, Do not doodle randomly.
- Return a hairstyle gradually; do not complete it earlier other parts of the portrait.
You volition find much more information on how to draw hair hither »
43. How to render tonal values
 There are many approaches to rendering tonal values. Hither, I will describe the classical way:
- It is better to kickoff from rendering big areas with the darkest tonal values.
- The process can develop gradually in multiple layers.
- The aim is to keep the cartoon getting darker simultaneously in all places without terminate i surface area before others.
- While shading, you need to keep an eye on relative values, comparing different areas to each other.
- When drawing in graphite pencil, the pencil tip should be precipitous at all times.
- Avert going the full strength a drawing tool tin can provide from the first.
- Utilise pencil strokes along the contours of objects.
- Reveal the volume of an object with strokes.
- Avert 90-degree cantankerous-hatching unless y'all draw a drapery.
- Keep the gamut of pencil strokes rich and wide – use various directions of strokes, pencil pressure, curvature and length of lines.
There are many more tips and professional person demonstrations on how to return tonal values presented in the Cartoon University video lessons »
44. Drawing small details
 Working on a drawing goes from big areas to pocket-sized details.
When working on smaller details, information technology is tempting to finish some places before the rest of the drawing. Professional creative person keeps the whole cartoon consummate, but not finished at all times until one decides that the artistic task is accomplished.
Smaller details in a portrait are shaded using the same rules of rendering tonal values as when shading big areas; however, shorter pencil strokes are required for such job.
The skilful way of working on a portrait is when drawing goes from big areas to small-scale details and and then back to big areas once again. Such cycle can be repeated several times. This will ensure that a portrait looks unified nevertheless detailed.
45. When to finish a head drawing
 The beauty of working on a portrait rendering it gradually is that it would look completed at all times. Then, it is your determination as an creative person when to finish it. However, if you leave the drawing slightly unfinished, it would appear more interesting to a viewer. Overworking a cartoon is less desirable than stopping but earlier you retrieve it is washed.
Conclusion
I hope this information on how to draw a portrait was helpful. This is just one way of drawing a portrait from many that are described in the Drawing Academy form. If you want to acquire more, enroll in the Drawing Academy course »
If y'all have any questions, you tin inquire Drawing Academy tutors online: //drawingacademy.com/drawing/ask-tutors-questions
I wish y'all all the creative success you deserve.
Vladimir London
Drawing Academy tutor and founder
Well-nigh the Writer
Vladimir London is the internationally published author of several art books and the founder and tutor of Cartoon Academy – the online video course where you lot can larn how to draw any you run into, think or imagine, using traditional drawing techniques.
He is also a creator of the Beefcake Master Class – //AnatomyMasterClass.com – the video course for fine artists who desire to learn fast all yous need to know most how to draw human figures and portraits with the necessary knowledge of human body, head and face anatomy and proportions.
Vladimir, together with Natalie Richy, fine artist and teacher, is also a co-founder of the Web Art University – //WebArtAcademy.com – the online video form that teaches traditional oil painting techniques.
To acquire how to draw any you see or imagine,
Enroll in the Drawing Academy Course:
Pay for the course in three piece of cake installments
- Receive 15 new videos monthly (45 in total)
- Incredible discount – $4,164
- Bonuses - Fine Art eBooks and Videos
- Drawing Academy Diploma of Excellence later class completion in 3 months
- Personal coaching past Cartoon University Tutors
- Lifetime membership. Free after the 3rd calendar month
Full cost: $291 (three $97 installments)

Get all video lessons for a ane-time payment
- Firsthand access to all 45 video lessons
- Incredible discount – $four,198
- Bonuses - Fine Fine art eBooks and Videos
- Drawing Academy Diploma of Excellence after course completion in 3 months
- Personal coaching past Drawing Academy Tutors
- Lifetime membership. No more than payments
Total cost - Only $257

Source: https://drawingacademy.com/how-to-draw-a-portrait
Posted by: hassourprive.blogspot.com
0 Response to "How To Draw Faces At Different Angles"
Post a Comment