

How To Draw Eyebrows How To Draw Female Eyebrows
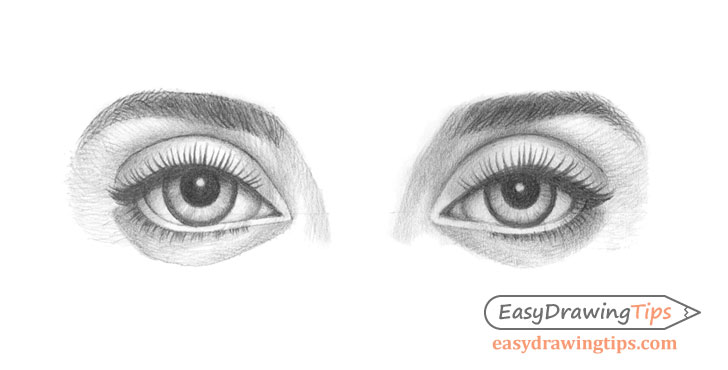
This tutorial shows how to draw three common variations of optics with step by step pencil drawing examples and instructions for each type.
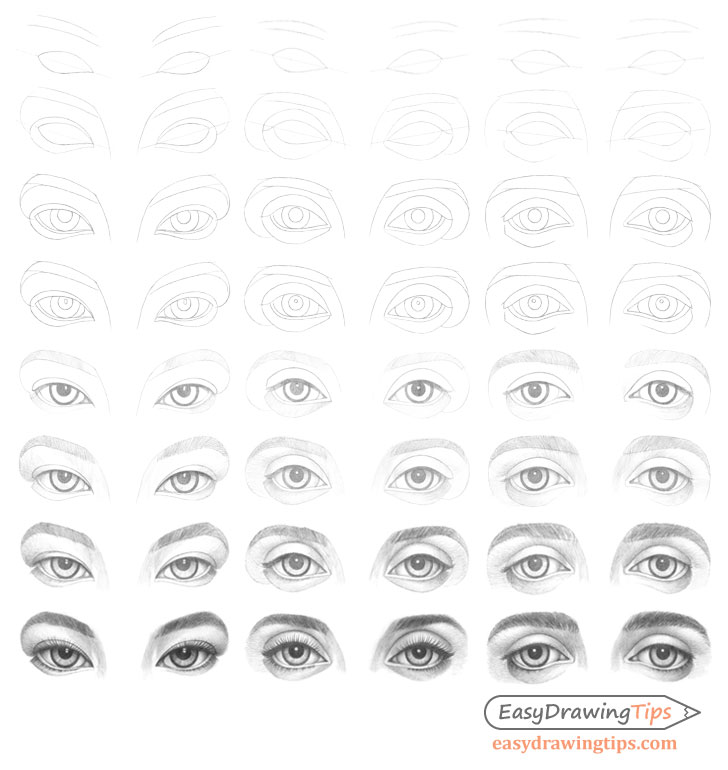
The three variations of optics in this tutorial include:
- Inner Angled Eyes
- Not-Angled Optics
- Outwards Angled Eyes
The instructions and examples consist of two parts, the line drawing and the shading.
In this example the line drawing will be used every bit more than of a "construction frame" for the shading instead of a stand alone cartoon. For this reason please be sure to make very low-cal lines that will alloy into the shading once yous are finished. The lines in some of the examples have been made darker simply and then that they are easier for you to come across.
Very importantly delight annotation that equally the shading procedure for each ready of optics is very similar so the get-go example provides the most detailed instructions. It'due south recommended that you read over these regardless of which pair of optics you want to draw. The rest of the examples take less instructions to avoid repetition.
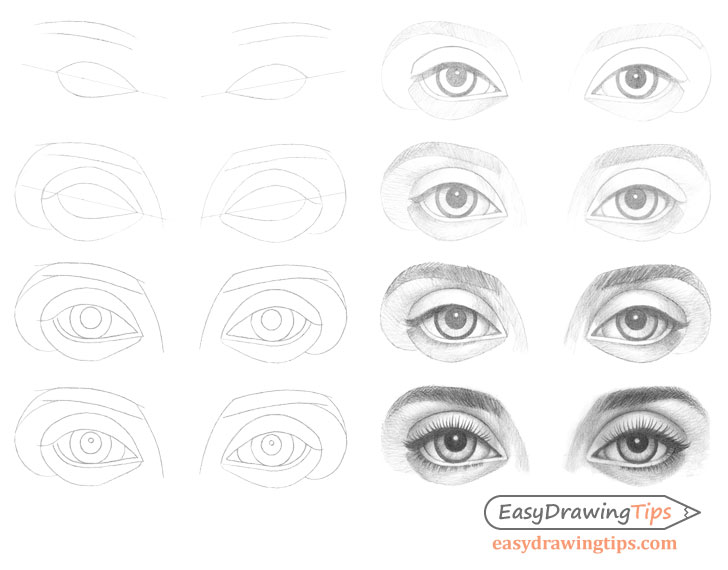
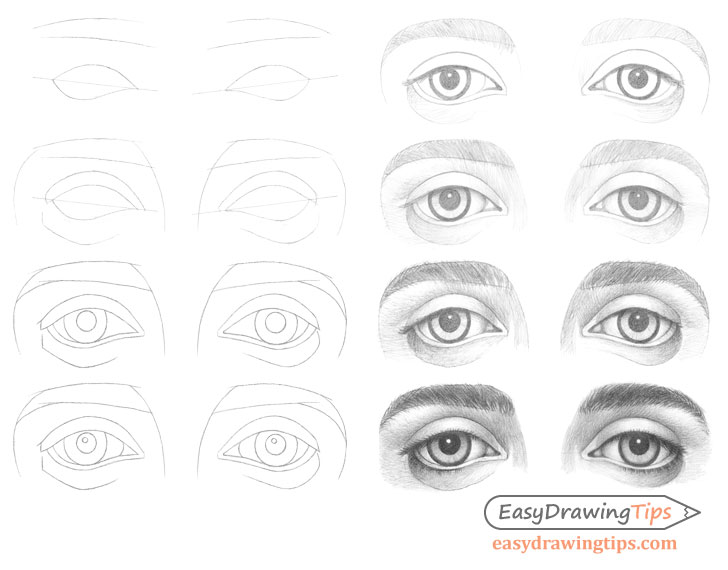
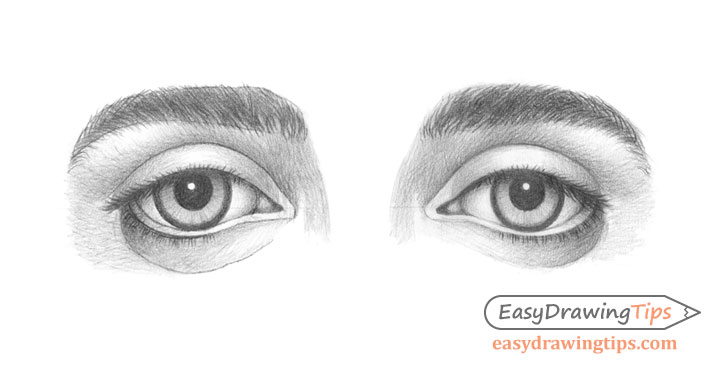
Drawing Inner Angled Eyes
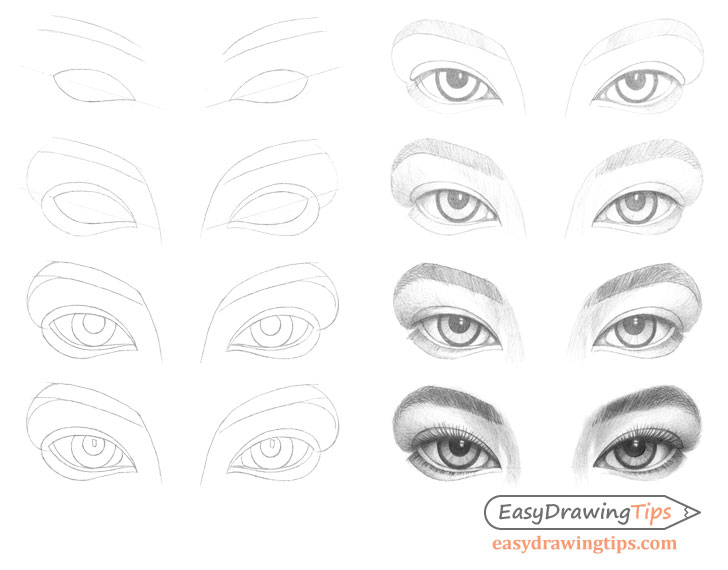
This example of the eyes is angled downwards towards the nose. Notwithstanding please don't confuse the angled guide lines in the adjacent step with the bending of the eyes. The "heart angles" in this tutorial refer to the rest of the overall shape of each centre.
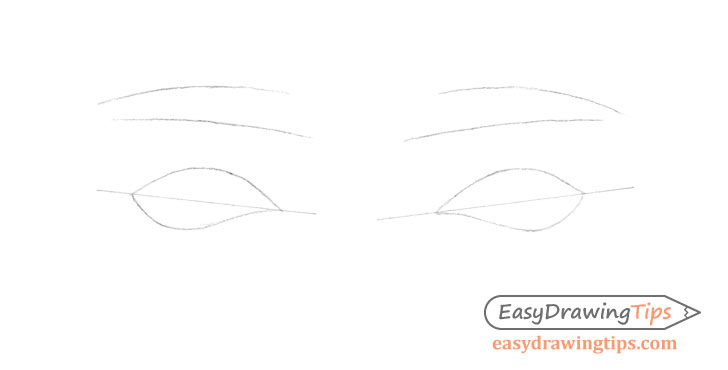
Step 1 – Depict the Outlines of the Optics & Eyebrows

Begin by making a pair of lines that volition act as guides to assistance you make sure that the meridian and bottom halves of each middle are similar in proportion to the other. Draw the outlines of the eyes based on these lines (as shown in in a higher place example). Likewise be certain to space the eyes far enough apart that you can fit at least one other eye between them.
As brusk distance above the outlines of the eyes add the basic shapes of the eyebrows. At this stage y'all can do it with just a pair of lines for each eyebrow.
For this pair of eyes the eyebrows volition be angled a fair fleck towards the nose similar to the eyes.
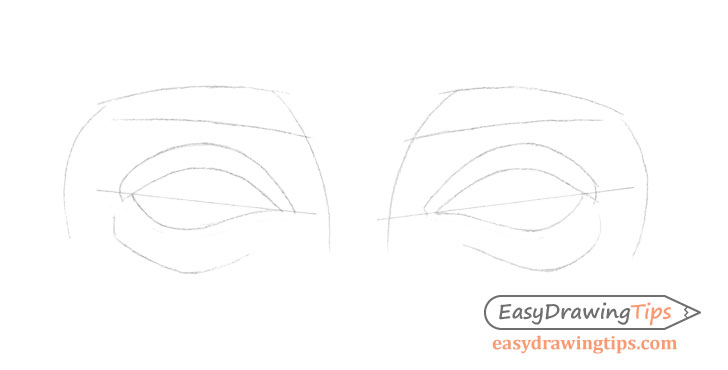
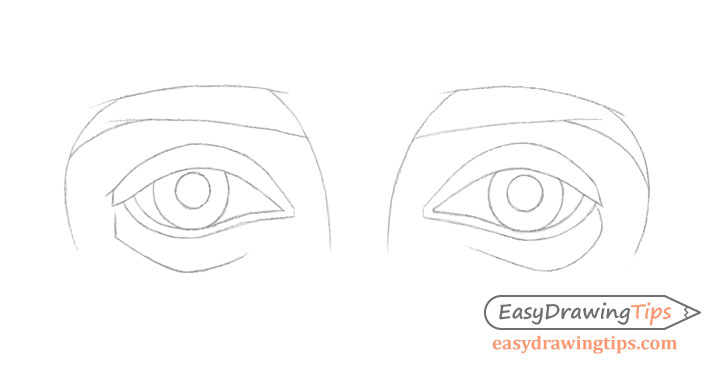
Stride 2 – Add together the Eyelids
Around the shapes of the eyes draw the outlines of the eyelids. Afterward that add the bridge of the nose that volition merge into the eyebrows every bit shown in the case.
Finally yous tin can besides add a pair of curves between the outer parts of the eyebrows and the out tips of the optics. These will help define the shape of the "around the eyes" area of the face.
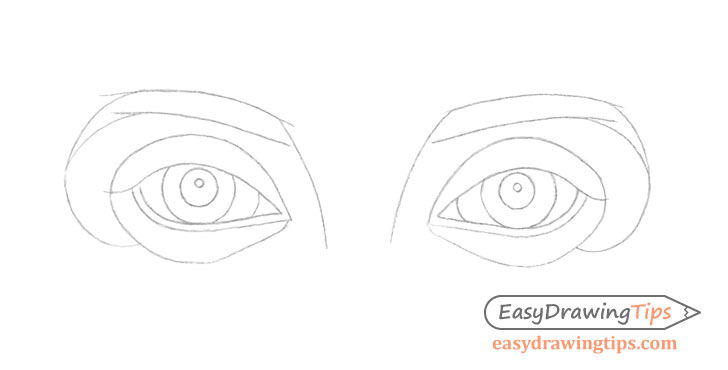
Footstep three – Depict the Irises & Pupils
Erase the guide lines from the starting time footstep and inside each centre draw the iris and educatee. As the optics in this case are in a adequately relaxed/natural state the tiptop portions of these should exist covered by the eyelids. If y'all make the entire iris visible the eyes tin can end up with a "crazy stare" kind of look.
Yous can also add another line to the bottom of each eyelid to show their edges/thickness.
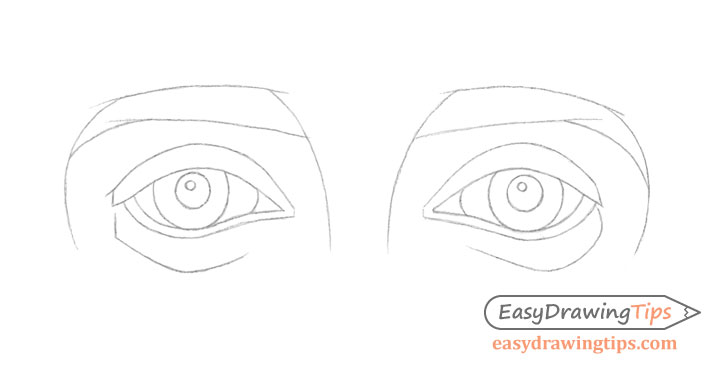
Step 4 – Depict the Highlights & Other Details
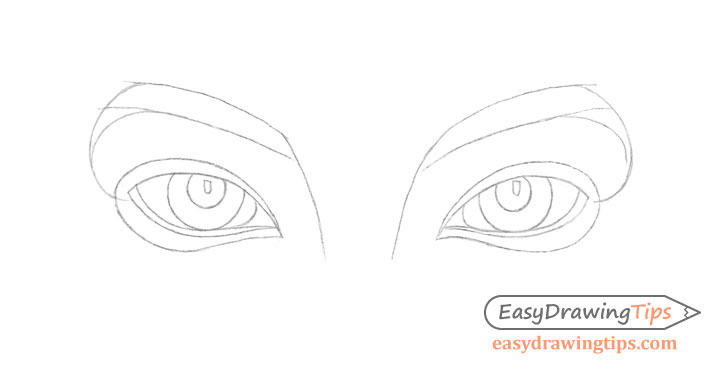
At the inner end of each eye depict the tear duct areas. After add a modest outline of the highlights within each pupil (light being reflected by the eye). The shape of these highlights will by and large be determined by the shape of the light source. Yous will desire to exit these areas white when shading.
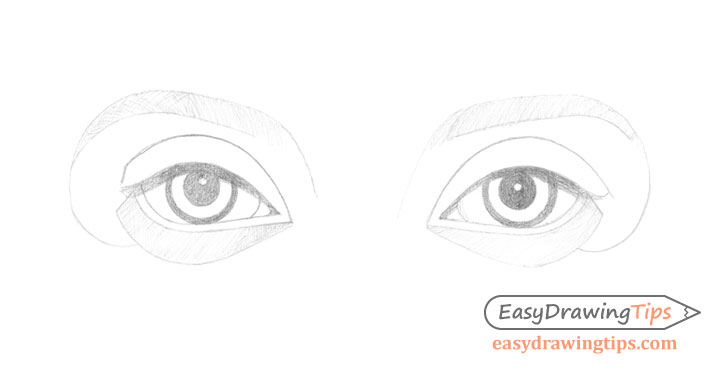
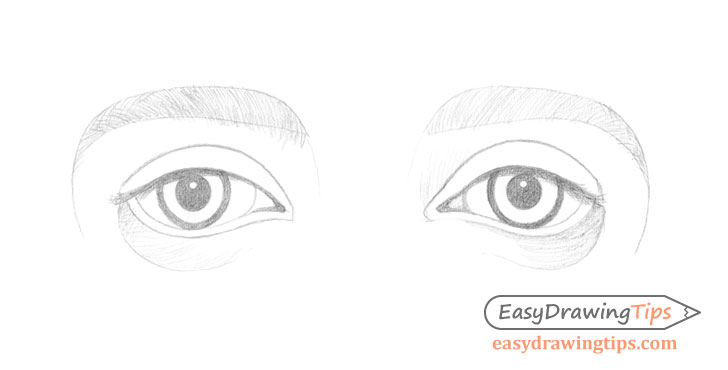
Footstep 5 – Begin Shading
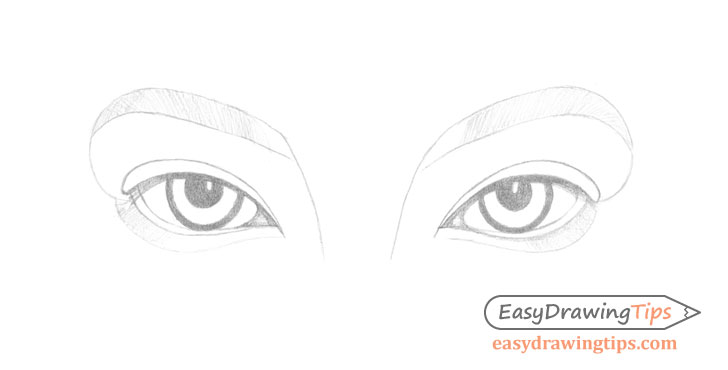
Earlier you begin shading anything (optics included) it's a good thought to be aware of the setup of the lighting. In this item case it will be fairly generic as though the subject is outside during the solar day or in a well lit room with the lite coming from above. This ways that well-nigh shadow will exist cast downwards and the areas that and "indented" will tend to exist darker.
When you being the bodily shading process make the initial layer of strokes fairly light. The goal of this pace is to create something like a "shading map" for yourself. If yous press on the pencil likewise hard yous may make some areas besides dark in relation to others to the bespeak where it no longer has enough dark value to create the correct difference between them. This is why you want to apply the shading gradually in several layers. While eventually the initial strokes will exist covered by more layers of shading information technology's nonetheless practiced practise to maintain their proper altitude and management.
For the eyebrows attempt and utilize the strokes in the management of the growth of the eyelashes and keep a proficient amount of space between them to create the effect of pilus. When shading the inner parts of the eyes (irises/pupils) you lot volition want to practise the opposite and completely blend the strokes to show that those areas are shine and reflective.
For more good drawing practices also see:
Beginner Guide to Learning to Draw
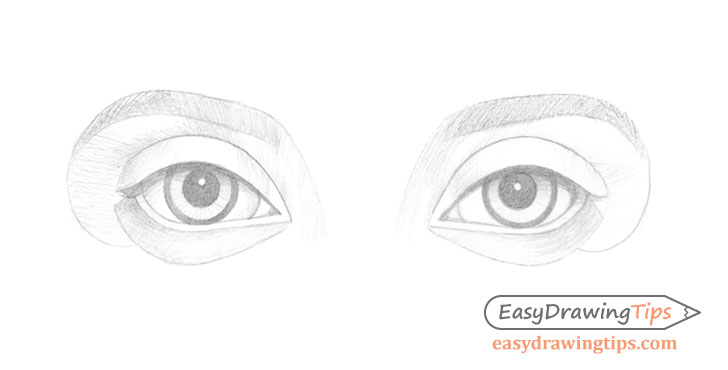
Stride 6 – Continue Shading
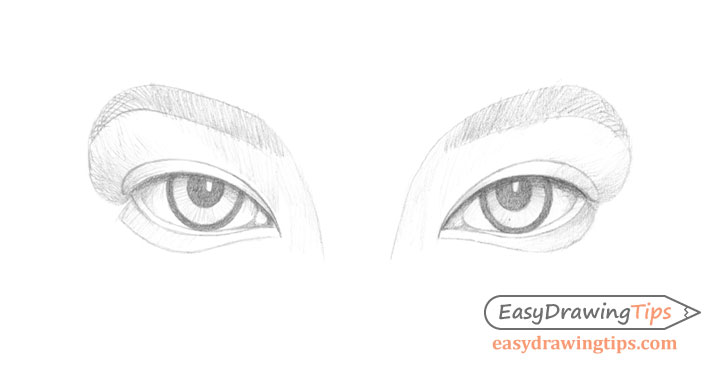
Utilize the next layer of shading strokes on a slight angle to the start layer so that they create a crosshatch. The only exception to that in this case can be the inner ends of the eyebrows. As the hair there tends to grow in pretty much one direction you can keep making all of the strokes in the aforementioned direction as well.
For an explanation of dissimilar stroke types see:
Shading Techniques and Stroke Types Drawing Tutorial
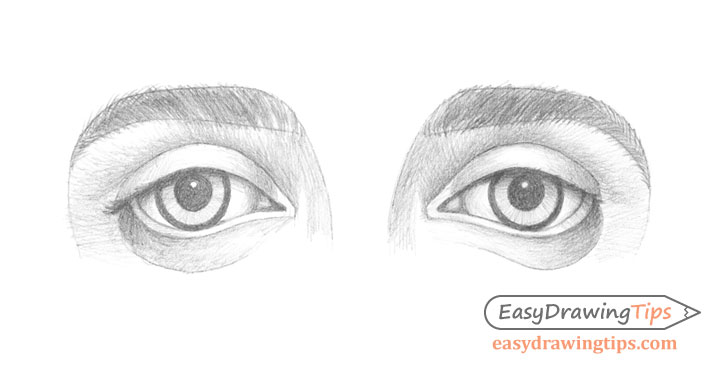
Step 7 – Refine the Shading

Darken the shading further by applying more layers of strokes bringing it close to the low-cal/dark contrast yous want to have in the finished drawing.
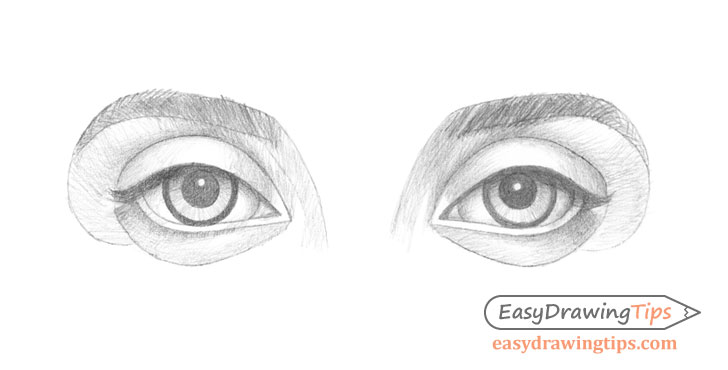
Pace 8 – Finish the Heart Drawing
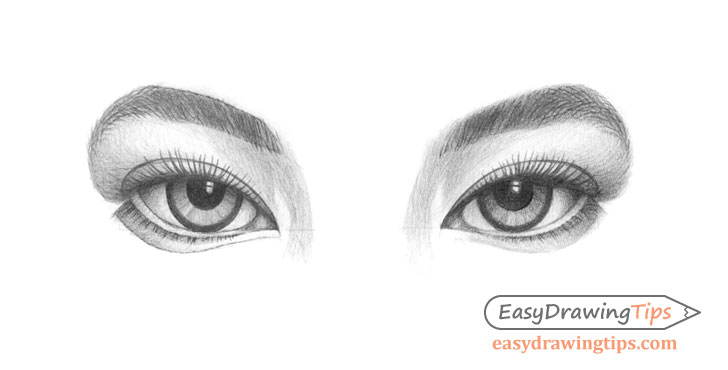
Fully darken the shading and shine out the gradients (transitions from low-cal to dark). To smooth out the gradients you can slightly blend the strokes in areas where they are also visible and add together filler strokes wherever there might not exist enough shading.
Once done with the shading add the eyelashes. To create these make quick curved strokes drawing outwards from the edge of the eyelids. Apply a proficient amount of pressure to the pencil and and so quickly pull it away from the paper.
You tin trace over the eyelashes with more than sets of strokes if they don't come out dark or thick plenty the outset time. You tin use a similar method within the eyebrows and make some very dark short strokes (especially towards the outer ends) that show individual hairs.
Cartoon Non-Angled Eyes
These types of eyes don't have much of an angle in either direction. Once more similar to the start pair of optics don't confuse the angled guide lines in the next pace with the overall angle of the eyes.
As already mentioned the "eye bending" in this tutorial refers to the overall residuum of the shape of the eyes.
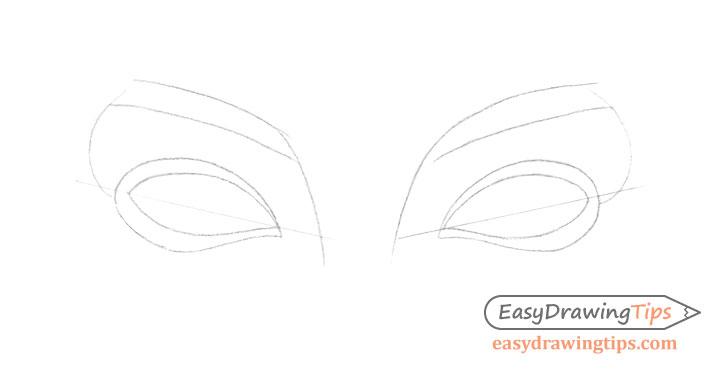
Stride 1 – Draw the Outlines of the Eyes & Eyebrows
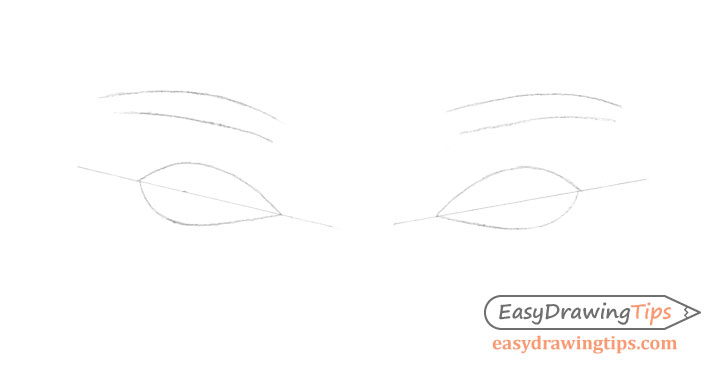
Star by drawing a pair of angled guide lines that you tin and then employ to help you lot draw the outer shapes of the optics.
Draw each eye with simply ii curves, one for the pinnacle and one for the bottom split by the lines. Be sure to leave enough space in between the eyes to at to the lowest degree fit in another eye.
After y'all finish the eyes describe just a few lines to get the shape and bending of the eyebrows. In this instance they will again exist angled towards the nose but less so than the previous example.
Pace 2 – Add the Eyelids
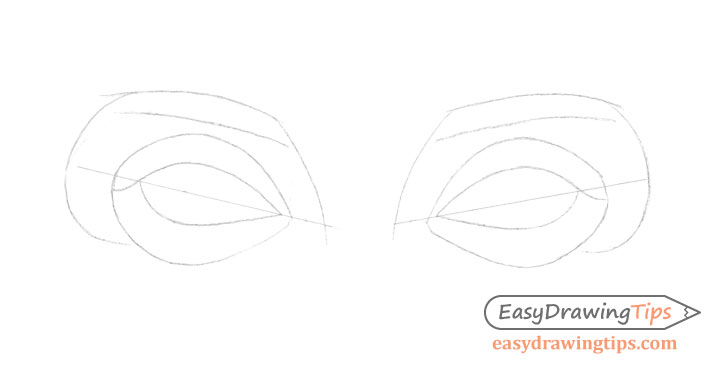
Around the optics draw the bones outlines of the eyelids. Next coming down from the eyebrows depict the bridge of the olfactory organ followed by a pair of curves coming downward from the contrary ends of the eyebrows to define the shape of the "around the optics" area.
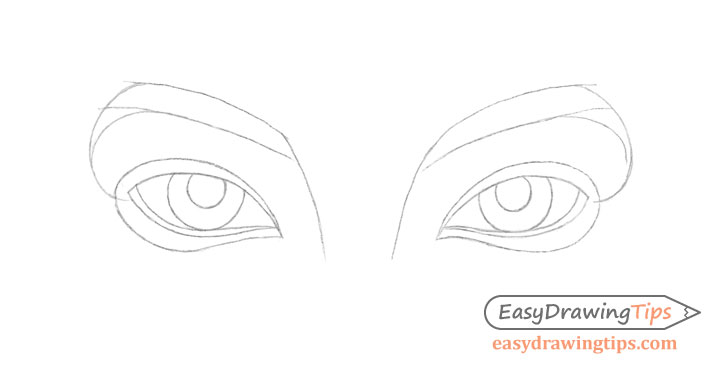
Step 3 – Draw the Irises & Pupils
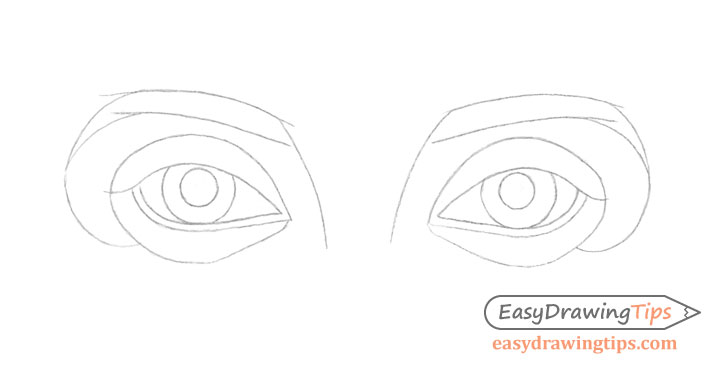
Erse the guide lines from step one and inside the outlines of the eyes draw the irises and pupils. Make sure that the tiptop of each iris is covered by the top eyelid and so that they eyes don't cease up with a "stare" look.
Beneath the bottom eyelid draw an boosted line pretty much tracing it's shape to show it'south border/thickness.
Step 4 – Draw the Highlights & Other Details
In the inner corner of each heart draw the tear duct area and inside each student outline the highlight (light reflecting class the smooth surface of the eyes).
Step 5 – Brainstorm Shading
As mentioned explained for the previous set of optics this shading will be done for fairly generic lighting conditions (well let room or daytime outdoors).
Begin shading the eyes with adequately light strokes (much lighter in all areas then you want to have for the concluding drawing). You can fully blend the shading inside the iris/student areas merely get out some distance between your strokes on the residue of the drawing. Especially so on the eyebrows as the strokes can help you create an effect of hairs. You lot should too use the strokes in the direction of the hair growth.
Pace half-dozen – Continue Shading
For the areas that have visible strokes apply another gear up at a slightly unlike bending to the first one. The only exception to this can be the inner ends of the eyebrows where y'all can make all of the strokes one directional.
Step 7 – Refine the Shading
Keep shading with more layers of strokes to bring it shut to the overall dark/low-cal contrast shut to what you desire to take in the last drawing.
Step 8 – End the Eye Drawing
Finally smooth out the shading by sort of "patching upwards" whatever areas that need with additional strokes.
Afterwards add the eyelashes past making some quick curved strokes. Draw these starting from the edges of the eyelids by pressing harder on the pencil towards their base and so pull your hand away course the paper every bit yous go to the tips. You tin can combine several strokes together if the eyelashes look besides sparse.
You tin can also utilise the same technique to add some hairs on the outer edges of the eyebrows.
Drawing Outer Angled Optics
These eyes are angled downwards towards the ears.
Step 1 – Draw the Outlines of the Optics & Eyebrows
Begin by making a pair of guide lines as shown in the above example. Around these lines describe the outlines of the eyes. Keep these far enough apart so that you take the distance of at least the width of one center between them.
Slightly above the eyes add a few lines to indicate the basic shape and angle of the eyebrows.
Footstep 2 – Add the Eyelids
Around the optics draw the outlines of the eyebrows. Subsequently add the bridge of the nose likewise as the outlines of the surrounding expanse. Both of these should merge into the eyebrows.
Step 3 – Draw the Irises & Pupils
Erase the guide lines from stride i and inside the outlines of the eyes draw the irises and pupils. Next below the bottom of each heart add together another gear up of lines to establish the edges/thickness of the bottom eyelids.
Step 4 – Describe the Highlights & Other Details
Add together the tear duct areas at the inner ends of the eyes followed past a pair of highlights inside the pupils to end the line drawing.
Stride five – Begin Shading
Aforementioned the the previous two various of the eyes this example will be shaded in fairly standard lighting atmospheric condition (well lit room or daytime outside).
Make the initial layer of shading fairly light. Yous tin can blend your strokes within the irises/pupils simply endeavour and continue the residual of the strokes visible. Specially so when it comes to the eyebrows to assist create the consequence of hair.
Pace 6 – Continue Shading

Add together anther layer of shading over tiptop of the first one gradually concealment the overall drawing. Attempt and brand this set of strokes on a slightly different angle to the showtime one in the areas where the stroke are visible. The only exception to this tin can be the inner ends of the eyebrows where y'all tin utilize the strokes in pretty much the same management as the fist set.
Footstep 7 – Refine the Shading
Apply even more layers of stroke to bring the dark and calorie-free residual of the drawing close to what you want to have once it's finished.
Stride viii – Finish the Heart Drawing
Terminate the shading past smoothing out the gradients and darkening the drawing where needed. Afterwards draw the eyebrows. Do this by making quick strokes where you outset press fairly difficult on the pencil and then speedily pull it away form the paper. This will help create eyelashes that are thicker towards their base and thinner towards their tips.
In this example the eyelashes of the top eyelid indicate more downwards than the previous example. This volition make them announced shorter every bit they indicate more towards the viewer.
Conclusion
This tutorial shows how to draw some of the more common variations of the eyes. There are of form many more variations out there but the step by step line drawing and shading approach provided in this tutorial can be applied to drawing those likewise.
For a tutorial on drawing different types of eyebrows encounter:
How to Draw Eyebrows Step by Step
For tutorials on drawing other parts of the face run into:
- How to Draw Different Nose Types
- 3 Step Nose Side View Drawing Tutorial
- How to Draw an Ear From the Front Footstep by Pace
- How to Draw Different Types of Lips
For tutorials on drawing the entire face encounter:
- How to Draw a Female person Face Step past Step Tutorial
- Tips on Cartoon the Aforementioned Male Face of Different Ages

Source: https://www.easydrawingtips.com/how-to-draw-different-eye-types-step-by-step/
Posted by: hassourprive.blogspot.com
0 Response to "How To Draw Eyebrows How To Draw Female Eyebrows"
Post a Comment